Showing posts with label Gesso. Show all posts

Wednesday, August 8, 2018

Birthday Card ► Viva Las VegaStamps

Hello, my dear friends,

I'm on the blog over at Viva Las VegaStamps today with a little tutorial for a Mixed Media Style Birthday Card ...


I'd love to see you there, happy crafting ♥

Monday, September 19, 2016

Challenge #234 at UYS - Butterflies

I used the Tim Holtz Mixed Media 2 dies for my tag, added Gesso and stamped it with StaZon in Rusty Brown. 

I cut the butterflies with the Tim Holtz Thinlits and added a sentiment from VLVS. A piece of Jute Rope finished my project :)

I try to show you the effect of the die cut covered with Texture Paste, looks so cool IRL ...


Tuesday, December 8, 2015

Card with Rubber Dance Stamps and EyeConnect Crafts

I used the scalloped wings from EyeConnect Crafts and a word stamp from Rubber Dance Stamps, it's on the "Vintage Romance" set. I also used the music notes from Rubber Dance on the wings!

Maybe I save the card for an anniversary or just for Valentines :)


I applied Gesso on the chipboard, then acrylic paint, stamped my image and added Inka Gold on the edges. 


Don't forget about the 15% discount code you'll get on your next order
in the Rubber Dance Online Store using "majo2015"


Monday, November 30, 2015

Mixed Media Canvas with the cute STAMPlorations Birdies :)

This little canvas has been sitting on my shelf since July, I just realized that I hadn't posted it on the blog yet. 

I used Gelatos for the background and a Dutch Dobadoo stencil for the circles. The beautiful birdies are from STAMPlorations, the words are from PI.


Friday, November 27, 2015

Winter Card and Tutorial at Rubber Dance Blog ♥

A little peek of my card with a cool and easy technique on the Rubber Dance Stamps Blog today ....


Happy Crafting!
 Don't forget about the 15% discount code you'll get on your next order in the Rubber Dance Online Store using "majo2015"

Monday, November 23, 2015

Hello there ♥

Good morning, crafty friends.
Before we all get into the annual hectic of creating Christmas cards, decorations and home decor, I decided to make a sunny and warm canvas.
I used Gelatos for the background and some Gesso with stencils, I stamped my giraffe and the sentiment on tissue. All done :)
 
 
 If you want to order some stamps in the Rubber Dance store you can use my special discount code "majo2015" and you will save 15% on your order!

Wednesday, November 18, 2015

LOTS OF LAYERS at MOO MANIA ♥

Good Morning, Moo Maniacs! 
We are happy that so many of you joined our last challenge. 
You showed us really great creations. And now it’s time for a new challenge. 

LOTS OF LAYERS

 You have two weeks to show us your projects. We can’t wait to see your creations. You may as always link all sorts of projects - not just the Moo format is permitted.

 A Moo is a little card sized 2.8 x 7.1 centimeters,
or approximately 1.1 x 2.8 inches. 

Come on over to our challenge blog and join in the fun, you can't imagine all the stuff that fits on that tiny little piece :)

Can't wait to see what you come up with!
 Here is my take, on a MOO, of course ;)
 

 .....and the back to prove it's the "right" size :)


I used Rubber Dance Stamps :)

Friday, November 6, 2015

Star Garland


Star Garland with EyeConnectCrafts and Rubber Dance Stamps ♥

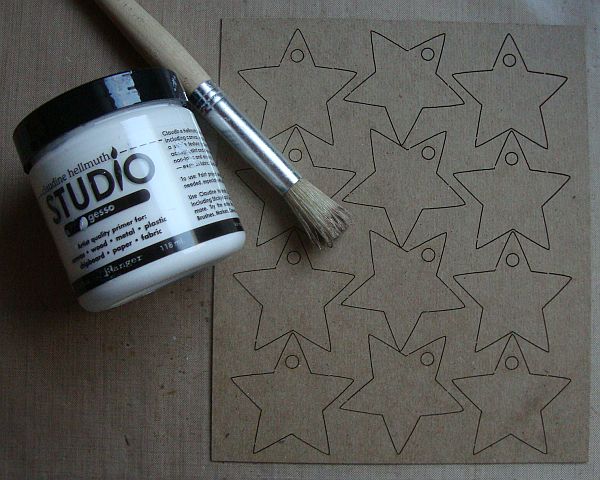
This week I received my huge load of EyeConnectCrafts Chipboards and instantly knew that I would used the Lace Up Stars first!


I Used Rubber Dance Stamps *Pines Fir Yew*


  I decided to leave the stars connected to apply Gesso and Perfect Pearl Mist *Biscotti* on both sides:


Time to pop them out :)


I used *Metal Magic* Embossing Powder from Debbi Moore, I love it, it's quite "chunky",


A bit of Distress Ink on the edges.


I used, what we call *Bouillondraht* here in Germany to connect my stars, and decorated a Christmas Tray.


.... and the complete tray 


Happy Crafting!
 Don't forget about the 15% discount code you'll get on your next order in the Rubber Dance Online Store using "majo2015"


Thursday, September 24, 2015

Altered Cigar Box


Hello my crafty friends!

Welcome to my Rubber Dance tutorial post.
Today I am going to show you how to turn a dull cigar box with a lot of stamps and some embellishments into a beautiful treasure box to keep for yourself or to give away. There is much room in the box, so someone will be a very happy person ;)


I started with Gesso to make the surface even. I used two shades of Brown and a tad of Red, since I knew my lace was going to be red.

I stamped all my images from the Set SEW SWEET on white card stock and cut them simply with scissors. I distressed the edges with Walnut Stain and set them aside.

I randomly stamped a few images on Design paper and also stamped the "tape measure"  on Sticky Canvas. The criss cross stitching is from our "Stitch & Frame" Set


I added sticky lace all around the lid of the box and decided against an knob or something else to open it, it is easy the way it is.
Here are some more pictures ....


I wish you a wonderful crafty day. See you all soon, Majo.

Stamp sets from Rubber Dance:
Sew Sweet
Stitch & Frame


Monday, September 14, 2015

Use Stencils on your project ♥

Challenge #191 at Use Your Stuff

I have chosen to use heart stencils on my project.


Since I know me and also the fact that I tend to cover a lot of my background, I show you what I started with, a canvas on which I used Gelatos and a heart stencil.

I added the birds from Darkroom Door and a sentiment from Crafty Impressions.
I mixed texture paste with distress ink "Wild Honey" and added some dots for more texture. I also randomly stamped with a sentiment stamp all over the canvas.
One of the little birds needed a goggle eye ;)
Have fun crafting, hope to see you here, where I can enjoy your creations ♥

Sunday, August 30, 2015

Dare to dream a little dream ...


Hi everybody, I want to share with you a canvas card I created with my MOST favorite stamp from the Da Vinci Set.

Let me show you how I made this ...
I started with these items:


I cut a piece of 4 x 5½" of sticky canvas and applied some white Gesso. I didn't go all the way to the edges since the canvas will take colour better without the Gesso. I coloured with Gelatos in Salmon, Yellow and Green.


This is what it looks like when you water it down:

I sprinkled some salt to add texture, with the salt still on:

.... and brushed off:


While it tried I distressed the edges ...


 And that's when I stared goofing. I tried to add embossing paste with my Tim Holtz stencil and didn't realize that it wouldn't stick to my Gelato background :(
Ok, no harm done, I just washed it off, dried it again and used Peeled Paint Distress ink. (Sorry, no picture, too excited by my mistake)
I stamped my image on tissue and adhered it to the side of my canvas with just a bit of white Gesso underneath. I stamped my sentiment from the brand new "Affirmation" set and added it to my card.
A black panel underneath and glued to Soft Suede card stock. Ready :)

 
I hope you enjoyed my little tutorial. Make sure you stop over at the shop to look at all the beautiful new sets available ... also Christmas sets are available, also all new :)
Happy crafting ♥